Identify Fastener and Gathering Dimensions
Before starting any work with the E-Drill, it is essential to correctly identify the fastener to ensure you use the right settings and tools. Proper identification reduces the risk of damage and ensures an efficient removal process. Most fastener information can easily be found on manufacturers’ websites or by searching for the fastener part number followed by “drawing.” For example, to obtain details about an HL13V8, a 1/4″ (-8) flush-installed tension Hi-Lok fastener common in the aerospace industry, you can search for “HL13V8 Drawing” or find it on Lisi Aerospace’s website: Lisi Aerospace Drawing Configurator.
To define the fastener completely, input the nominal geometric dimensions from the engineering drawing into the corresponding fields. Only flush head fasteners require a head angle input. Using the HL13V8 drawing as an example, here are the details you would gather:
- Head Type: Flush or Protruding.
- HL13 fasteners are 100° Flush MS24694 Tension Head Titanium Pins.
- Material: The standard available materials include Alloy Steel, Aluminum, Inconel, Monel, Stainless/CRES, and Titanium.
- The HL13V8 Pin in this example is made of titanium.
- Radius: Radius of the transition from head to stem. Determines cut depth.
- Typically defined as R on drawings. For our Example of the HL13V8-4, you would find the row for the -8 (1/4″) pin and follow it to column R. That would show a nominal radius of 0.025″
- Head Height: Needed for depth and precision.
- On the HL13V8 drawing, column “H” shows a nominal head height of 0.107″.
- Head Angle: Determines cut depth. Not applicable to protruding/button head fasteners.
- The head angle for all HL13 fasteners is 100°.
- Shank Diameter: Required to determine the correct electrode size.
- The shank diameter can be found under column D. Be sure to not mix this up with the head diameter of the fastener. Column “D” on the drawing shows a shank diameter of 0.189″.
- Head Diameter: Though not used when building a fastener in the system, it helps in selecting or machining the appropriate bombsight aperture or button head locator bushing.
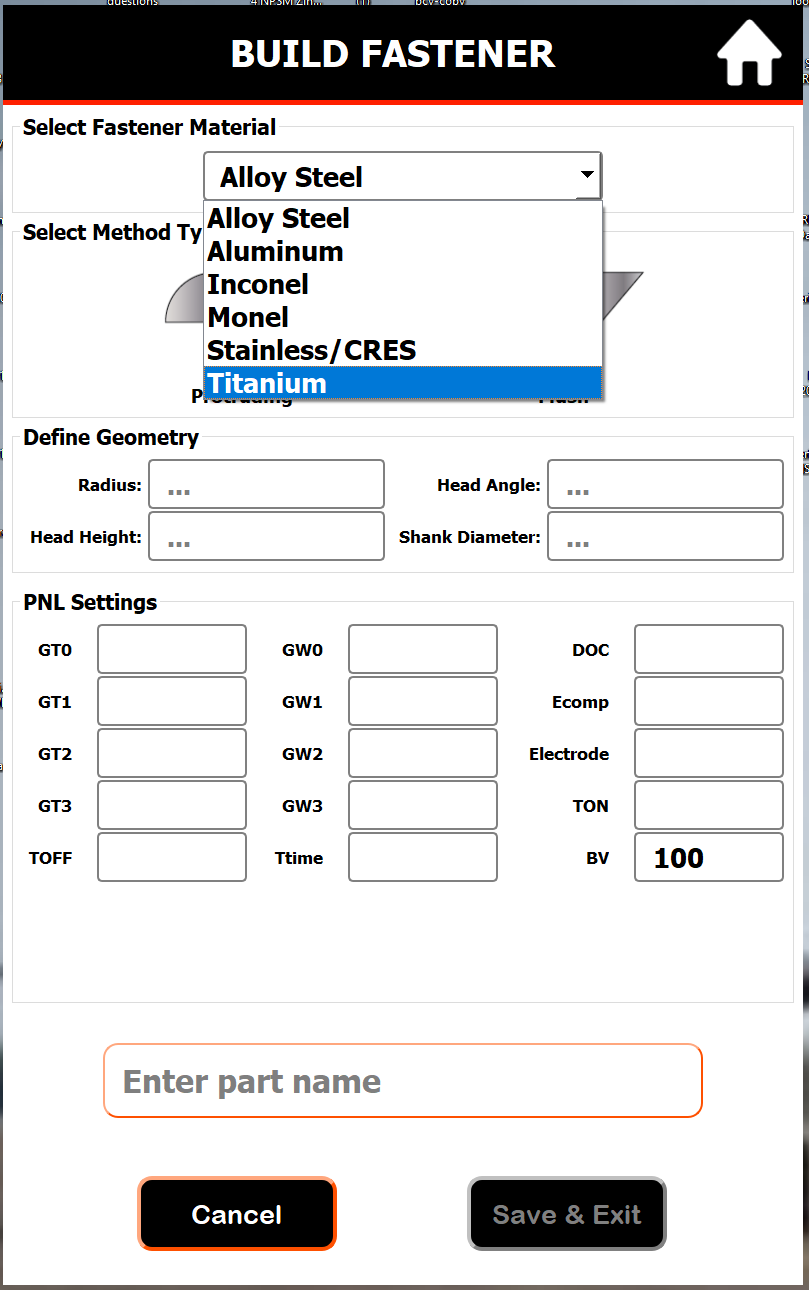
Build Fastener Screen
NOTE: This feature is only accessible by an Admin user. Material and geometric properties MUST be obtained from the specific fastener engineering drawing.
The build fastener screen is used to program the HMI Touchscreen for new fasteners that are not already in the fastener library. This screen is only available for select users assigned with build fastener privileges such as Admin and other advanced users. Because this process cannot be error-proofed and relies on the operator providing the correct information to system, we suggest you keep these permissions available for only select trusted users.
The build fastener function can be accessed by selecting “Build” from the Fastener Menu.
Select the fastener material from the drop-down list. The standard available materials include Alloy Steel, Aluminum, Inconel, Monel, Stainless/CRES, and Titanium. If the fastener material you need to cut is not listed, please contact PPEM support, as this is a special case application.
 Depending on the method of removal, select protruding or flush head icon. All button-head, pan head, rivets and collar style removals that utilize a mechanical locator will use the protruding removal method. All countersunk or flush head fasteners that require optical locating will use the flush head removal method.
To fully define the fastener, input the nominal geometric dimensions from the engineering drawing into the corresponding fields. These details ensure the proper electrode size, depth settings, and locator tools are used. Only a flush head will require a head angle input:
-
- Radius: Radius of the transition from head to stem. Determines cut depth.
- Head Height: Needed for depth and precision.
- Stem Diameter: Required to determine the correct electrode size.
- Head Angle: Determines cut depth. Only for flush fasteners
Note: Make sure the proper fastener radius, head height, head angle, and shank diameter are input in Define Geometry fields, as these determine the electrode and cut depth that will be recommended.

Enter a part/fastener name and press “Save & Exit.” The TSD should display a confirmation that the built fastener was added to the library. All built fasteners will then be accessible via the Fastener Library.
Note: Admin users can edit all fasteners within the fastener library from the Current Part screen (see following section).
CAUTION
Once the other 4 parameters are selected, the system will automatically suggest the Stem Size. It is critical that the user check that the suggestion is correct, since for certain shear head fasteners the suggestion may be incorrect.
CAUTION
It is not possible combinations may be in the fastener library, it is possible to pick a combination for which there is not a library entry. If that occurs, a Red panel will appear indicating that a library entry has not been found, and the user should re-select. When this occurs, the user should check the default values to ensure they will work or recheck their selection.
Upon successful loading of the command the home screen will display the cut parameters and identify the correct electrode cutter for that command.
Edit Existing Fastener
Admin users have the ability to edit fasteners saved in the fastener library. This is done by selecting PNL Settings from the Current Part screen. This is only visible when logged into an advanced/admin user profile. This feature is useful if a change in cut depth or target time is desired. If the cut depth is changed, only one cut should be made before continuing, and a careful inspection of the hole post-removal should be done to ensure breakout has not occurred. If the target time needs to be adjusted to prevent excessive under or overtime warnings, do so by editing the “Ttime” value.
Note: It is not advised to increase the depth by more than 0.010 at a time.